上篇我们分析了 hami-scheduler 中 Spread、Binpack 等高级调度策略是怎么实现的。
本文为 HAMi 原理分析的第五篇,简单分析一下 HAMi-Core(libvgpu.so) vCUDA 的工作原理,包括怎么生效的,CUDA API 怎么拦截的,以及是怎么实现的对 GPU 的 core、memory 资源的 limit 的。
HAMi-core 项目就是 vCUDA 的核心实现,正如其 README 所说:HAMi-core operates by Hijacking the API-call between CUDA-Runtime(libcudart.so) and CUDA-Driver(libcuda.so), as the figure below:
主要解决下面这几个问题:
1)libvgpu.so 是怎么生效的?
2)CUDA API 怎么拦截的?
3)gpu memory 是怎么限制的?
4)gpu core 是怎么限制的?
对 C 并不是很熟悉,所以有什么地方写错了,大家一定留言指正呀~
TL;DR
libvgpu.so 是怎么生效的?
CUDA API 怎么拦截的?
通过重写 dlsym 函数,以劫持 NVIDIA 动态链接库(如 CUDA 和 NVML)的调用,特别是针对以 cu 和 nvml 开头的函数进行拦截。
gpu memory 是怎么限制的?
首先是拦截 NVMLAPI 中的 _nvmlDeviceGetMemoryInfo,实现在执行 nvidia-smi 命令时只展示申请的 Memory(来源于CUDA_DEVICE_MEMORY_LIMIT_X)。
然后是拦截内存分配相关的 CUDA API,比如:cuMemoryAllocate 和 cuMemAlloc_v2。
分配内存之前,增加了 oom_check,当前 Pod 的 GPU 内存使用量 超过 限制的内存使用量(来源于CUDA_DEVICE_MEMORY_LIMIT_X)时直接返回 OOM。
gpu core 是怎么限制的?
同理,拦截提交 Kernel 相关的 CUDA API,例如:cuLaunchKernel。
提交 Kernel 之前,增加 rate_limit 逻辑,具体算法类似令牌桶,每次提交 kernel 都会消耗 Token,直到某次提交 kernel 发现没有 Token 时就会直接 sleep, 一段时间之后 Token 恢复了,又可以继续提交任务了。
恢复 Token 时就会用到CUDA_DEVICE_SM_LIMIT 环境变量。
正文开始~
1. libvgpu.so 是怎么生效的
怎么被挂载进 Pod 的
这部分是 hami-device-plugin-nvidia 组件在处理,具体是 Allocate 方法,相关代码如下:
  1
  2
  3
  4
  5
  6
  7
  8
  9
 10
 11
 12
 13
 14
 15
 16
 17
 18
 19
 20
 21
 22
 23
 24
 25
 26
 27
 28
 29
 30
 31
 32
 33
 34
 35
 36
 37
 38
 39
 40
 41
 42
 43
 44
 45
 46
 47
 48
 49
 50
 51
 52
 53
 54
 55
 56
 57
 58
 59
 60
 61
 62
 63
 64
 65
 66
 67
 68
 69
 70
 71
 72
 73
 74
 75
 76
 77
 78
 79
 80
 81
 82
 83
 84
 85
 86
 87
 88
 89
 90
 91
 92
 93
 94
 95
 96
 97
 98
 99
100
101
102
103
104
105
106
107
108
109
110
111
112
113
114
115
116
117
118
119
120
121
122
123
124
125
126
127
128
// pkg/device-plugin/nvidiadevice/nvinternal/plugin/server.go#L385
func ( plugin * NvidiaDevicePlugin ) Allocate ( ctx context . Context , reqs * kubeletdevicepluginv1beta1 . AllocateRequest ) ( * kubeletdevicepluginv1beta1 . AllocateResponse , error ) {
klog . InfoS ( "Allocate" , "request" , reqs )
responses := kubeletdevicepluginv1beta1 . AllocateResponse {}
nodename := os . Getenv ( util . NodeNameEnvName )
current , err := util . GetPendingPod ( ctx , nodename )
if err != nil {
nodelock . ReleaseNodeLock ( nodename , NodeLockNvidia )
return & kubeletdevicepluginv1beta1 . AllocateResponse {}, err
}
klog . V ( 5 ). Infof ( "allocate pod name is %s/%s, annotation is %+v" , current . Namespace , current . Name , current . Annotations )
for idx , req := range reqs . ContainerRequests {
// If the devices being allocated are replicas, then (conditionally)
// error out if more than one resource is being allocated.
if strings . Contains ( req . DevicesIDs [ 0 ], "MIG" ) {
if plugin . config . Sharing . TimeSlicing . FailRequestsGreaterThanOne && rm . AnnotatedIDs ( req . DevicesIDs ). AnyHasAnnotations () {
if len ( req . DevicesIDs ) > 1 {
return nil , fmt . Errorf ( "request for '%v: %v' too large: maximum request size for shared resources is 1" , plugin . rm . Resource (), len ( req . DevicesIDs ))
}
}
for _ , id := range req . DevicesIDs {
if ! plugin . rm . Devices (). Contains ( id ) {
return nil , fmt . Errorf ( "invalid allocation request for '%s': unknown device: %s" , plugin . rm . Resource (), id )
}
}
response , err := plugin . getAllocateResponse ( req . DevicesIDs )
if err != nil {
return nil , fmt . Errorf ( "failed to get allocate response: %v" , err )
}
responses . ContainerResponses = append ( responses . ContainerResponses , response )
} else {
currentCtr , devreq , err := GetNextDeviceRequest ( nvidia . NvidiaGPUDevice , * current )
klog . Infoln ( "deviceAllocateFromAnnotation=" , devreq )
if err != nil {
device . PodAllocationFailed ( nodename , current , NodeLockNvidia )
return & kubeletdevicepluginv1beta1 . AllocateResponse {}, err
}
if len ( devreq ) != len ( reqs . ContainerRequests [ idx ]. DevicesIDs ) {
device . PodAllocationFailed ( nodename , current , NodeLockNvidia )
return & kubeletdevicepluginv1beta1 . AllocateResponse {}, errors . New ( "device number not matched" )
}
response , err := plugin . getAllocateResponse ( plugin . GetContainerDeviceStrArray ( devreq ))
if err != nil {
return nil , fmt . Errorf ( "failed to get allocate response: %v" , err )
}
err = EraseNextDeviceTypeFromAnnotation ( nvidia . NvidiaGPUDevice , * current )
if err != nil {
device . PodAllocationFailed ( nodename , current , NodeLockNvidia )
return & kubeletdevicepluginv1beta1 . AllocateResponse {}, err
}
if plugin . operatingMode != "mig" {
for i , dev := range devreq {
limitKey := fmt . Sprintf ( "CUDA_DEVICE_MEMORY_LIMIT_%v" , i )
response . Envs [ limitKey ] = fmt . Sprintf ( "%vm" , dev . Usedmem )
}
response . Envs [ "CUDA_DEVICE_SM_LIMIT" ] = fmt . Sprint ( devreq [ 0 ]. Usedcores )
response . Envs [ "CUDA_DEVICE_MEMORY_SHARED_CACHE" ] = fmt . Sprintf ( "%s/vgpu/%v.cache" , hostHookPath , uuid . New (). String ())
if plugin . schedulerConfig . DeviceMemoryScaling > 1 {
response . Envs [ "CUDA_OVERSUBSCRIBE" ] = "true"
}
if plugin . schedulerConfig . DisableCoreLimit {
response . Envs [ util . CoreLimitSwitch ] = "disable"
}
cacheFileHostDirectory := fmt . Sprintf ( "%s/vgpu/containers/%s_%s" , hostHookPath , current . UID , currentCtr . Name )
os . RemoveAll ( cacheFileHostDirectory )
os . MkdirAll ( cacheFileHostDirectory , 0777 )
os . Chmod ( cacheFileHostDirectory , 0777 )
os . MkdirAll ( "/tmp/vgpulock" , 0777 )
os . Chmod ( "/tmp/vgpulock" , 0777 )
response . Mounts = append ( response . Mounts ,
& kubeletdevicepluginv1beta1 . Mount { ContainerPath : fmt . Sprintf ( "%s/vgpu/libvgpu.so" , hostHookPath ),
HostPath : hostHookPath + "/vgpu/libvgpu.so" ,
ReadOnly : true },
& kubeletdevicepluginv1beta1 . Mount { ContainerPath : fmt . Sprintf ( "%s/vgpu" , hostHookPath ),
HostPath : cacheFileHostDirectory ,
ReadOnly : false },
& kubeletdevicepluginv1beta1 . Mount { ContainerPath : "/tmp/vgpulock" ,
HostPath : "/tmp/vgpulock" ,
ReadOnly : false },
)
found := false
for _ , val := range currentCtr . Env {
if strings . Compare ( val . Name , "CUDA_DISABLE_CONTROL" ) == 0 {
// if env existed but is set to false or can not be parsed, ignore
t , _ := strconv . ParseBool ( val . Value )
if ! t {
continue
}
// only env existed and set to true, we mark it "found"
found = true
break
}
}
if ! found {
response . Mounts = append ( response . Mounts , & kubeletdevicepluginv1beta1 . Mount { ContainerPath : "/etc/ld.so.preload" ,
HostPath : hostHookPath + "/vgpu/ld.so.preload" ,
ReadOnly : true },
)
}
_ , err = os . Stat ( fmt . Sprintf ( "%s/vgpu/license" , hostHookPath ))
if err == nil {
response . Mounts = append ( response . Mounts , & kubeletdevicepluginv1beta1 . Mount {
ContainerPath : "/tmp/license" ,
HostPath : fmt . Sprintf ( "%s/vgpu/license" , hostHookPath ),
ReadOnly : true ,
})
response . Mounts = append ( response . Mounts , & kubeletdevicepluginv1beta1 . Mount {
ContainerPath : "/usr/bin/vgpuvalidator" ,
HostPath : fmt . Sprintf ( "%s/vgpu/vgpuvalidator" , hostHookPath ),
ReadOnly : true ,
})
}
}
responses . ContainerResponses = append ( responses . ContainerResponses , response )
}
}
klog . Infoln ( "Allocate Response" , responses . ContainerResponses )
device . PodAllocationTrySuccess ( nodename , nvidia . NvidiaGPUDevice , NodeLockNvidia , current )
return & responses , nil
}
核心部分:
1
2
3
4
5
response . Mounts = append ( response . Mounts ,
& kubeletdevicepluginv1beta1 . Mount { ContainerPath : fmt . Sprintf ( "%s/vgpu/libvgpu.so" , hostHookPath ),
HostPath : hostHookPath + "/vgpu/libvgpu.so" ,
ReadOnly : true },
)
有一个挂载 libvgpu.so 的操作,使用的是 HostPath,来源于环境变量, HAMi 部署时默认用的/usr/local。
1
2
3
func init () {
hostHookPath , _ = os . LookupEnv ( "HOOK_PATH" )
}
怎么被加载上的
hami-device-plugin-nvidia Allocate 中还有这么一段逻辑:
 1
 2
 3
 4
 5
 6
 7
 8
 9
10
11
12
13
14
15
16
17
18
19
found : = false
for _ , val : = range currentCtr . Env {
if strings . Compare ( val . Name , "CUDA_DISABLE_CONTROL" ) == 0 {
// if env existed but is set to false or can not be parsed, ignore
t , _ : = strconv . ParseBool ( val . Value )
if ! t {
continue
}
// only env existed and set to true, we mark it "found"
found = true
break
}
}
if ! found {
response . Mounts = append ( response . Mounts , & kubeletdevicepluginv1beta1 . Mount { ContainerPath : "/etc/ld.so.preload" ,
HostPath : hostHookPath + "/vgpu/ld.so.preload" ,
ReadOnly : true },
)
}
当没有手动指定 CUDA_DISABLE_CONTROL=true 环境变量来关闭 HAMi 隔离时,就会挂载 宿主机上的/usr/local/vgpu/ld.so.preload 这个文件到 Pod 里的/etc/ld.so.preload。
在 Linux 系统中,/etc/ld.so.preload 是一个特殊的文件,系统会在加载共享库时,优先加载该文件中列出的共享库。这个文件通常用于强制加载特定的共享库,在系统启动或程序运行时覆盖默认的动态链接库行为。
Linux 下动态库加载顺序为:LD_PRELOAD>LD_LIBRARY_PATH>/etc/ld.so.cache>/lib>/usr/lib。
通过 LD_PRELOAD 可以保证一定加载我们自定义的 libvgpu.so。
在宿主机上查看下这个文件中的内容:
1
2
3
4
root@j99cloudvm:~/lixd/hami# ls /usr/local/vgpu
containers  ld.so.preload  libvgpu.so
root@j99cloudvm:~/lixd/hami# cat /usr/local/vgpu/ld.so.preload
/usr/local/vgpu/libvgpu.so
里面的内容是/usr/local/vgpu/libvgpu.so,也就是通过该文件可以实现优先加载我们从外部挂载进去的 libvgpu.so。
一句话总结:通过 LD_PRELOAD 方式加载自己实现的 libvgpu.so。
core&memory 阈值
libvgpu.so 怎么指定要把 core、memory 限制在多少呢?
这部分也是 hami-device-plugin-nvidia Allocate 中实现的,Allocatte 中为 Pod 注入了相关环境变量:CUDA_DEVICE_MEMORY_LIMIT 和 CUDA_DEVICE_SM_LIMIT。
1
2
3
4
5
for i , dev : = range devreq {
limitKey : = fmt . Sprintf ( "CUDA_DEVICE_MEMORY_LIMIT_%v" , i )
response . Envs [ limitKey ] = fmt . Sprintf ( "%vm" , dev . Usedmem )
}
response . Envs [ "CUDA_DEVICE_SM_LIMIT" ] = fmt . Sprint ( devreq [ 0 ]. Usedcores )
这样 libvgpu.so 就知道该限制在多少了。
小结
这一段分析了 libvgpu.so 是怎么生效的。
1)hami-device-plugin-nvidia 启动时将镜像中的 libvgpu.so 复制到宿主机,默认在 /usr/local/vgpu/libvgpu.so 位置。
2)Pod 创建时,hami-device-plugin-nvidia 中的 Allocate 方法使用 hostPath 将宿主机上的 /usr/local/vgpu/libvgpu.so 文件挂载到 Pod 里。
3)同时使用 /etc/ld.so.preload 实现优先加载上一步中挂载的 libvgpu.so 库,也是 Allocate 方法中将宿主机上的 /usr/local/vgpu/ld.so.preload 挂载到 Pod 里 /etc/ld.so.preload
至此,已经实现了在 Pod 中加载共享库时优先加载我们自定义的 libvgpu.so。
2. CUDA API 怎么拦截的
这部分则分析 HAMi-Core(libvgpu.so)中怎么实现对 CUDA API 进行拦截的。
重写 dlsym 函数拦截 CUDA API
重写 dlsym 函数
dlsym 是一个用于符号解析的函数,声明在 dlfcn.h 头文件中,适用于 Linux 系统和其他符合 POSIX 标准的系统。它允许程序在运行时动态地加载和使用共享库中的符号。
HAMi-core 中重写了 dlsym 函数,以劫持 NVIDIA 动态链接库(如 CUDA 和 NVML)的调用,特别是针对以 cu 和 nvml 开头的函数进行拦截。
1)初始化 dlsym
2)如果以 cu 开头则特殊处理,使用 __dlsym_hook_section(handle, symbol)
3)如果以 nvml 开头也特殊处理,使用 __dlsym_hook_section_nvml(handle, symbol)
4)最后,如果前面都没找到则使用真正的 dlsym
完整代码如下:
 1
 2
 3
 4
 5
 6
 7
 8
 9
10
11
12
13
14
15
16
17
18
19
20
21
22
23
24
25
26
27
28
29
30
31
32
33
34
35
36
37
38
39
40
41
42
43
44
45
# src/libvgpu.c#L77-L116
FUNC_ATTR_VISIBLE void * dlsym ( void * handle , const char * symbol ) {
pthread_once ( & dlsym_init_flag , init_dlsym );
LOG_DEBUG ( "into dlsym %s" , symbol );
// 1. 初始化 dlsym
if ( real_dlsym == NULL ) {
real_dlsym = dlvsym ( RTLD_NEXT , "dlsym" , "GLIBC_2.2.5" );
if ( real_dlsym == NULL ) {
real_dlsym = _dl_sym ( RTLD_NEXT , "dlsym" , dlsym );
if ( real_dlsym == NULL )
LOG_ERROR ( "real dlsym not found" );
}
}
if ( handle == RTLD_NEXT ) {
void * h = real_dlsym ( RTLD_NEXT , symbol );
int tid ;
pthread_mutex_lock ( & dlsym_lock );
tid = pthread_self ();
if ( check_dlmap ( tid , h )){
LOG_WARN ( "recursive dlsym : %s \n " , symbol );
h = NULL ;
}
pthread_mutex_unlock ( & dlsym_lock );
return h ;
}
// 2. 如果以 cu 开头则特殊处理,使用 __dlsym_hook_section(handle, symbol)
if ( symbol [ 0 ] == 'c' && symbol [ 1 ] == 'u' ) {
pthread_once ( & pre_cuinit_flag ,( void ( * )( void )) preInit );
void * f = __dlsym_hook_section ( handle , symbol );
if ( f != NULL )
return f ;
}
// 3. 如果以 nvml 开头也特殊处理,使用 __dlsym_hook_section_nvml(handle, symbol)
#ifdef HOOK_NVML_ENABLE
if ( symbol [ 0 ] == 'n' && symbol [ 1 ] == 'v' &&
symbol [ 2 ] == 'm' && symbol [ 3 ] == 'l' ) {
void * f = __dlsym_hook_section_nvml ( handle , symbol );
if ( f != NULL ) {
return f ;
}
}
#endif
//4. 最后,如果前面都没找到则使用真正的 dlsym
return real_dlsym ( handle , symbol );
}
cu函数处理:__dlsym_hook_section
__dlsym_hook_section 定义了对于 cu 开头的符号,该怎么处理,具体如下:
__dlsym_hook_section_nvml 也是类似的,就不赘述了。
 1
 2
 3
 4
 5
 6
 7
 8
 9
10
11
12
13
14
15
16
17
18
19
20
21
22
23
24
25
26
27
28
void * __dlsym_hook_section ( void * handle , const char * symbol ) {
int it ;
// 1.先判断该 symbol 是否在待拦截的 CUDA API 列表中
// 如果存在则跳出循环,不存在直接返回 NULL
for ( it = 0 ; it < CUDA_ENTRY_END ; it ++ ){
if ( strcmp ( cuda_library_entry [ it ]. name , symbol ) == 0 ){
if ( cuda_library_entry [ it ]. fn_ptr == NULL ) {
LOG_WARN ( "NEED TO RETURN NULL" );
return NULL ;
} else {
break ;
}
}
}
// 2. 这部分是一系列宏定义
//Context
DLSYM_HOOK_FUNC ( cuCtxGetDevice );
DLSYM_HOOK_FUNC ( cuCtxCreate );
// ....
DLSYM_HOOK_FUNC ( cuGraphDestroy );
#ifdef HOOK_MEMINFO_ENABLE
DLSYM_HOOK_FUNC ( cuMemGetInfo_v2 );
#endif
// 3.最后,如果没找到也返回 NULl
return NULL ;
}
核心逻辑在 DLSYM_HOOK_FUNC 中,接下来看下 DLSYM_HOOK_FUNC 宏定义。
宏定义 DLSYM_HOOK_FUNC
DLSYM_HOOK_FUNC 的定义如下:
 1
 2
 3
 4
 5
 6
 7
 8
 9
10
11
12
13
#if defined(DLSYM_HOOK_DEBUG)
#define DLSYM_HOOK_FUNC(f)                                       \
    if (0 == strcmp(symbol, #f)) {                               \
        LOG_DEBUG("Detect dlsym for %s\n", #f);                     \
        return (void*) f; }                                      \

#else

#define DLSYM_HOOK_FUNC(f)                                       \
    if (0 == strcmp(symbol, #f)) {                               \
        return (void*) f; }                                      \

#endif
#ff 转换为字符串文字。例如,#f 将 cuGraphDestroy 转换成字符串 "cuGraphDestroy"。
strcmp(symbol, #f)strcmp 是一个比较两个字符串的函数。如果 symbol 与 #f 字符串匹配(即 symbol 的值为 "cuGraphDestroy"),则 strcmp 返回 0。
return (void*) f;strcmp 返回 0,即 symbol 等于 f,则返回 f 对应的函数指针。(void*) f 将函数指针强制转换为 void* 类型,表示返回一个通用的函数指针。
举个例子🌰:
DLSYM_HOOK_FUNC(cuGraphDestroy); 会被展开为下面这样:
1
2
3
if ( 0 == strcmp ( symbol , "cuGraphDestroy" )) {
return ( void * ) cuGraphDestroy ;
}
小结
至此,逻辑就比较清楚了,重写 dlsym 函数,对于 cu 和 nvml 开头的特殊处理。
以 cuGraphDestroy 为例
hook.c
主要通过 dlopen 和 dlsym 函数加载 CUDA 库,并重定向 CUDA 库中的函数调用,以实现拦截、监控或修改 CUDA 函数的行为。
待拦截 CUDA API 列表
首先是通过cuda_library_entry 定义了哪些 CUDA 函数需要进行拦截,具体要拦截的 CUDA API 列表如下:
 1
 2
 3
 4
 5
 6
 7
 8
 9
10
11
12
13
14
15
16
17
18
19
#src/cuda/hook.c#L8-L219
cuda_entry_t cuda_library_entry [] = {
/* Init Part */
{. name = "cuInit" },
/* Deivce Part */
{. name = "cuDeviceGetAttribute" },
// .....
/* Context Part */
{. name = "cuDevicePrimaryCtxGetState" },
/* cuda 11.7 external resource interoperability */
{. name = "cuImportExternalMemory" },
/* Graph part */
{. name = "cuGraphCreate" },
{. name = "cuGraphDestroy" },
{. name = "cuGetProcAddress" },
{. name = "cuGetProcAddress_v2" },
};
加载 CUDA API 地址
然后则是使用 load_cuda_libraries 函数获取各个 CUDA 函数的地址:
 1
 2
 3
 4
 5
 6
 7
 8
 9
10
11
12
13
14
15
16
17
18
19
20
21
22
23
24
25
26
27
28
29
30
31
32
33
34
35
36
37
38
39
40
41
void load_cuda_libraries () {
void * table = NULL ;
int i = 0 ;
char cuda_filename [ FILENAME_MAX ];
char tmpfunc [ 500 ];
LOG_INFO ( "Start hijacking" );
snprintf ( cuda_filename , FILENAME_MAX - 1 , "%s" , "libcuda.so.1" );
cuda_filename [ FILENAME_MAX - 1 ] = '\0' ;
table = dlopen ( cuda_filename , RTLD_NOW | RTLD_NODELETE );
if ( ! table ) {
LOG_WARN ( "can't find library %s" , cuda_filename );
}
for ( i = 0 ; i < CUDA_ENTRY_END ; i ++ ) {
LOG_DEBUG ( "LOADING %s %d" , cuda_library_entry [ i ]. name , i );
cuda_library_entry [ i ]. fn_ptr = real_dlsym ( table , cuda_library_entry [ i ]. name );
if ( ! cuda_library_entry [ i ]. fn_ptr ) {
cuda_library_entry [ i ]. fn_ptr = real_dlsym ( RTLD_NEXT , cuda_library_entry [ i ]. name );
if ( ! cuda_library_entry [ i ]. fn_ptr ){
LOG_INFO ( "can't find function %s in %s" , cuda_library_entry [ i ]. name , cuda_filename );
memset ( tmpfunc , 0 , 500 );
strcpy ( tmpfunc , cuda_library_entry [ i ]. name );
while ( prior_function ( tmpfunc )) {
cuda_library_entry [ i ]. fn_ptr = real_dlsym ( RTLD_NEXT , tmpfunc );
if ( cuda_library_entry [ i ]. fn_ptr ) {
LOG_INFO ( "found prior function %s" , tmpfunc );
break ;
}
}
}
}
}
LOG_INFO ( "loaded_cuda_libraries" );
if ( cuda_library_entry [ 0 ]. fn_ptr == NULL ){
LOG_WARN ( "is NULL" );
}
dlclose ( table );
}
libcuda_hook.h
src/include/libcuda_hook.h 里面则是上一步拿到的 CUDA 函数的真正拦截实现。
src/include/libnvml\_hook.h 则是对 NVML 库的拦截,类似的,就不在赘述。
这个代码片段定义了一个用于拦截 CUDA 函数调用的机制,它的基本原理是通过函数指针重定向 CUDA 函数调用,从而实现对 CUDA 函数的拦截和替换 。
原始 CUDA 函数表 cuda_entry_t 就是 hook.c 中得到的:
1
2
3
4
typedef struct {
void * fn_ptr ;
char * name ;
} cuda_entry_t ;
这个结构体 cuda_entry_t 保存了 CUDA 函数的指针 (fn_ptr) 和函数名 (name)。通过将所有要拦截的 CUDA 函数存储在一个数组中,程序可以动态找到并调用这些函数。
函数枚举 cuda_override_enum_t
1
2
3
4
5
6
typedef enum {
CUDA_OVERRIDE_ENUM ( cuInit ),
// ... 其他 CUDA 函数
CUDA_OVERRIDE_ENUM ( cuGraphInstantiate ),
CUDA_ENTRY_END
} cuda_override_enum_t ;
cuda_override_enum_t 枚举了所有要拦截的 CUDA 函数。每个 CUDA 函数都有一个对应的枚举值,通过这个枚举可以索引到函数指针表中的具体函数。
宏定义:CUDA_OVERRIDE_ENUM
1
#define CUDA_OVERRIDE_ENUM(x) OVERRIDE_##x
这个宏的作用是将 x 前面加上 OVERRIDE_ 前缀 。
具体来说,如果你传入 cuInit,它就会转换成 OVERRIDE_cuInit。
宏定义:CUDA_OVERRIDE_CALL
函数调用重定向 CUDA_OVERRIDE_CALL
这里就是具体的 Hijacking 逻辑,这里看起来没有啥逻辑,就是加了一个日志打印
1
2
3
4
5
6
7
8
#define CUDA_OVERRIDE_CALL(table, sym, ...) \
  ({ \
    LOG_DEBUG("Hijacking %s", #sym); \
    cuda_sym_t _entry = (cuda_sym_t)CUDA_FIND_ENTRY(table, sym); \
    _entry(__VA_ARGS__); \
  })

  #define CUDA_FIND_ENTRY(table, sym) ({ (table)[CUDA_OVERRIDE_ENUM(sym)].fn_ptr; })
CUDA_OVERRIDE_CALL 宏通过函数表中的函数指针来重定向 CUDA 函数调用:
CUDA_FIND_ENTRY 会根据传入的 sym(函数枚举)从 table 中找到对应的函数指针。
cuda_sym_t 定义为一个函数指针类型,用于调用 CUDA 函数。
_entry(__VA_ARGS__) 实际上就是调用找到的 CUDA 函数,并传入参数。
这个宏在每次调用时都会输出日志,例如 LOG_DEBUG("Hijacking %s", #sym) 表示拦截了某个函数。
就是根据函数枚举值,在 cuda_library_entry 中找到具体的函数地址,然后进行调用。
CUDA_FIND_ENTRY 则在 table 根据名称查询对应的函数地址。
小结
这部分分享了 HAMi-Core(libvgu.so) 是如何对 CUDA API 进行拦截的。
核心是通过重新 dlsym 函数,替换函数地址实现。
3. gpu memory 是怎么限制的
这部分分析 HAMi-Core 怎么实现 memory limit 的。
这里分为两部分:
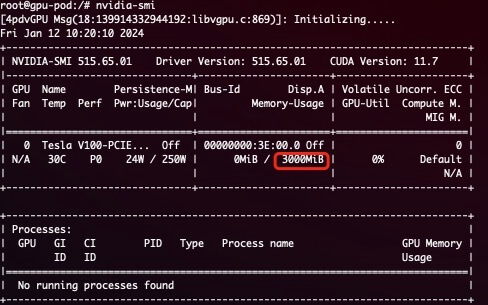
NVML 当我们申请 3000M 内存时,Pod 中执行 nvidia-smi 看到的就是 3000M:
1
2
3
4
resources :
limits :
nvidia.com/gpu : 1 # declare how many physical GPUs the pod needs
nvidia.com/gpumem : 3000 # identifies 3G GPU memory each physical GPU allocates to the pod
具体怎么实现的呢?其实是拦截的 NVML 中的 _nvmlDeviceGetMemoryInfo API。
_nvmlDeviceGetMemoryInfo
具体实现如下:
 1
 2
 3
 4
 5
 6
 7
 8
 9
10
11
12
13
14
15
16
17
18
19
20
21
22
23
24
25
26
27
28
29
30
31
32
33
34
35
36
37
38
39
40
41
42
43
44
45
46
47
48
49
// src/nvml/hook.c#L316
nvmlReturn_t _nvmlDeviceGetMemoryInfo ( nvmlDevice_t device , nvmlMemory_t * memory , int version ) {
unsigned int dev_id ;
LOG_DEBUG ( "into nvmlDeviceGetMemoryInfo" );
switch ( version ){
case 1 :
CHECK_NVML_API ( NVML_OVERRIDE_CALL ( nvml_library_entry , nvmlDeviceGetMemoryInfo , device , memory ));
break ;
case 2 :
CHECK_NVML_API ( NVML_OVERRIDE_CALL ( nvml_library_entry , nvmlDeviceGetMemoryInfo_v2 , device , ( nvmlMemory_v2_t * ) memory ));
}
LOG_DEBUG ( "origin_free=%lld total=%lld \n " , memory -> free , memory -> total );
CHECK_NVML_API ( nvmlDeviceGetIndex ( device , & dev_id ));
int cudadev = nvml_to_cuda_map ( dev_id );
if ( cudadev < 0 )
return NVML_SUCCESS ;
size_t usage = get_current_device_memory_usage ( cudadev );
size_t monitor = get_current_device_memory_monitor ( cudadev );
size_t limit = get_current_device_memory_limit ( cudadev );
LOG_DEBUG ( "usage=%ld limit=%ld monitor=%ld" , usage , limit , monitor );
if ( memory == NULL ) {
return NVML_SUCCESS ;
}
if ( limit == 0 ){
switch ( version ){
case 1 :
memory -> used = usage ;
return NVML_SUCCESS ;
case 2 :
(( nvmlMemory_v2_t * ) memory ) -> used = usage ;
return NVML_SUCCESS ;
}
} else {
switch ( version ){
case 1 :
memory -> free = ( limit - usage );
memory -> total = limit ;
memory -> used = usage ;
return NVML_SUCCESS ;
case 2 :
(( nvmlMemory_v2_t * ) memory ) -> used = usage ;
(( nvmlMemory_v2_t * ) memory ) -> total = limit ;
(( nvmlMemory_v2_t * ) memory ) -> used = usage ;
return NVML_SUCCESS ;
}
}
return NVML_SUCCESS ;
}
核心部分
1
2
3
4
size_t usage = get_current_device_memory_usage( cudadev) ;
size_t monitor = get_current_device_memory_monitor( cudadev) ;
size_t limit = get_current_device_memory_limit( cudadev) ;
LOG_DEBUG( "usage=%ld limit=%ld monitor=%ld" ,usage,limit,monitor) ;
Limit 就是总量,也就是前面展示的 3000M,看下 get_current_device_memory_limit 怎么实现的
get_current_device_memory_limit
1
2
3
4
5
6
7
uint64_t get_current_device_memory_limit( const int dev) {
ensure_initialized() ;
if ( dev < 0 || dev >= CUDA_DEVICE_MAX_COUNT) {
LOG_ERROR( "Illegal device id: %d" , dev) ;
}
return region_info.shared_region->limit[ dev] ;
}
也是很简单,就是直接返回了,看下 region_info 这个信息是怎么获取的
do_init_device_memory_limits
 1
 2
 3
 4
 5
 6
 7
 8
 9
10
11
12
13
14
15
16
17
18
void do_init_device_memory_limits ( uint64_t * arr , int len ) {
size_t fallback_limit = get_limit_from_env ( CUDA_DEVICE_MEMORY_LIMIT );
int i ;
for ( i = 0 ; i < len ; ++ i ) {
char env_name [ CUDA_DEVICE_MEMORY_LIMIT_KEY_LENGTH ] = CUDA_DEVICE_MEMORY_LIMIT ;
char index_name [ 8 ];
snprintf ( index_name , 8 , "_%d" , i );
strcat ( env_name , index_name );
size_t cur_limit = get_limit_from_env ( env_name );
if ( cur_limit > 0 ) {
arr [ i ] = cur_limit ;
} else if ( fallback_limit > 0 ) {
arr [ i ] = fallback_limit ;
} else {
arr [ i ] = 0 ;
}
}
}
可以看到,是从 CUDA_DEVICE_MEMORY_LIMIT_X 环境变量中读取到的。
也就是用户申请的 nvidia.com/gpumem
具体调用的地方在 initialized 函数里:
 1
 2
 3
 4
 5
 6
 7
 8
 9
10
11
12
13
14
15
16
17
18
19
20
21
22
23
24
25
26
27
// multiprocess_memory_limit.c#L780
void initialized () {
pthread_mutex_init ( & _kernel_mutex , NULL );
char * _record_kernel_interval_env = getenv ( "RECORD_KERNEL_INTERVAL" );
if ( _record_kernel_interval_env ) {
_record_kernel_interval = atoi ( _record_kernel_interval_env );
}
try_create_shrreg ();
init_proc_slot_withlock ();
}
// multiprocess_memory_limit.c#L669
void try_create_shrreg () {
LOG_DEBUG ( "Try create shrreg" )
if ( region_info . fd == - 1 ) {
// use .fd to indicate whether a reinit after fork happen
// no need to register exit handler after fork
if ( 0 != atexit ( exit_handler )) {
LOG_ERROR ( "Register exit handler failed: %d" , errno );
}
}
// 初始化 limit 数组
do_init_device_memory_limits (
region -> limit , CUDA_DEVICE_MAX_COUNT );
LOG_DEBUG ( "shrreg created" );
}
至此,NVML 部分就分析完了~,接下来分析下 CUDA API 是怎么实现 Memory Limit 的。
CUDA
cuMemAlloc_v2
HAMi-Core 对相关方法都做了重新实现,比如:
 1
 2
 3
 4
 5
 6
 7
 8
 9
10
11
12
13
14
15
16
17
18
// src/cuda/memory.c#L129-L145
CUresult cuMemoryAllocate ( CUdeviceptr * dptr , size_t bytesize , size_t * bytesallocated , void * data ){
CUresult res ;
if ( bytesallocated != NULL )
* bytesallocated = bytesize ;
res = CUDA_OVERRIDE_CALL ( cuda_library_entry , cuMemAlloc_v2 , dptr , bytesize );
return res ;
}
CUresult cuMemAlloc_v2 ( CUdeviceptr * dptr , size_t bytesize ) {
LOG_INFO ( "into cuMemAllocing_v2 dptr=%p bytesize=%ld" , dptr , bytesize );
ENSURE_RUNNING ();
CUresult res = allocate_raw ( dptr , bytesize );
if ( res != CUDA_SUCCESS )
return res ;
LOG_INFO ( "res=%d, cuMemAlloc_v2 success dptr=%p bytesize=%lu" , 0 ,( void * ) * dptr , bytesize );
return CUDA_SUCCESS ;
}
cuMemoryAllocate 和 cuMemAlloc_v2 都是 CUDA 中用于在 GPU 上分配内存,内部也是调用了 allocate_raw,继续追一下。
add_chunk
allocate_raw 实现如下:
1
2
3
4
5
6
7
8
// src/allocator/allocator.c#L184-L190
int allocate_raw ( CUdeviceptr * dptr , size_t size ){
int tmp ;
pthread_mutex_lock ( & mutex );
tmp = add_chunk ( dptr , size );
pthread_mutex_unlock ( & mutex );
return tmp ;
}
内部也调用了 add_chunk:
 1
 2
 3
 4
 5
 6
 7
 8
 9
10
11
12
13
14
15
16
17
18
19
20
21
22
23
24
25
26
27
28
29
30
31
// src/allocator/allocator.c#L131-L151
int add_chunk ( CUdeviceptr * address , size_t size ){
size_t addr = 0 ;
size_t allocsize ;
CUresult res = CUDA_SUCCESS ;
CUdevice dev ;
cuCtxGetDevice ( & dev );
if ( oom_check ( dev , size ))
return - 1 ;
allocated_list_entry * e ;
INIT_ALLOCATED_LIST_ENTRY ( e , addr , size );
if ( size <= IPCSIZE )
res = CUDA_OVERRIDE_CALL ( cuda_library_entry , cuMemAlloc_v2 , & e -> entry -> address , size );
else {
//size = round_up(size,ALIGN);
e -> entry -> length = size ;
res = cuMemoryAllocate ( & e -> entry -> address , size , & e -> entry -> length , e -> entry -> allocHandle );
}
if ( res != CUDA_SUCCESS ){
LOG_ERROR ( "cuMemoryAllocate failed res=%d" , res );
return res ;
}
LIST_ADD ( device_overallocated , e );
//uint64_t t_size;
* address = e -> entry -> address ;
allocsize = size ;
cuCtxGetDevice ( & dev );
add_gpu_device_memory_usage ( getpid (), dev , allocsize , 2 );
return 0 ;
}
其中有一个自定义的校验逻辑:
1
2
if ( oom_check ( dev , size ))
return - 1 ;
oom_check
oom_check 实现:
 1
 2
 3
 4
 5
 6
 7
 8
 9
10
11
12
13
14
15
16
17
18
19
20
21
22
23
24
25
26
int oom_check ( const int dev , size_t addon ) {
int count1 = 0 ;
CUDA_OVERRIDE_CALL ( cuda_library_entry , cuDeviceGetCount , & count1 );
CUdevice d ;
if ( dev ==- 1 )
cuCtxGetDevice ( & d );
else
d = dev ;
uint64_t limit = get_current_device_memory_limit ( d );
size_t _usage = get_gpu_memory_usage ( d );
if ( limit == 0 ) {
return 0 ;
}
size_t new_allocated = _usage + addon ;
LOG_INFO ( "_usage=%lu limit=%lu new_allocated=%lu" , _usage , limit , new_allocated );
if ( new_allocated > limit ) {
LOG_ERROR ( "Device %d OOM %lu / %lu" , d , new_allocated , limit );
if ( rm_quitted_process () > 0 )
return oom_check ( dev , addon );
return 1 ;
}
return 0 ;
}
核心部分逻辑
1
2
3
4
5
6
7
if ( new_allocated > limit ) {
LOG_ERROR ( "Device %d OOM %lu / %lu" , d , new_allocated , limit );
if ( rm_quitted_process () > 0 )
return oom_check ( dev , addon );
return 1 ;
}
新分配内存如果超过了限制,会进行一次清理,如果清理之后还是内存不够,就直接返回 1 ,配合前面的 if
1
2
if ( oom_check ( dev , size ))
return - 1 ;
最终返回 -1,表示 OOM。
这样就实现了 Memory Limit。
4. gpu core 是怎么限制的
这部分分析 HAMi-Core 是怎么实现 core limit 的。
什么是 Kernel
在此之前,先简单解释一下什么是 Kernel。
在 CUDA 编程中,Kernel 是在 GPU 上并行执行的函数,开发人员编写 Kernel 来描述并行计算任务,然后在主机上调用 Kernel 来在 GPU 上执行计算。
在 CUDA 程序架构中,host 代码部分在 CPU 上执行,是普通的 C 代码。当遇到数据并行处理的部分,CUDA 会将程序编译成 GPU 能执行的程序,并传送到 GPU,这个程序在 CUDA 里称做核(kernel)。device 代码部分在 GPU 上执行,此代码部分在 kernel 上编写(.cu 文件)。
一个简单的 Demo 如下:
 1
 2
 3
 4
 5
 6
 7
 8
 9
10
11
12
13
14
15
16
17
18
19
20
21
22
23
24
25
26
27
28
29
30
31
32
33
34
35
36
37
38
39
40
41
42
43
#include <iostream>
#include <math.h>
// Kernel function to add the elements of two arrays
// __global__ 变量声明符,作用是将 add 函数变成可以在 GPU 上运行的函数
// __global__ 函数被称为 kernel
__global__
void add ( int n , float * x , float * y )
{
for ( int i = 0 ; i < n ; i ++ )
y [ i ] = x [ i ] + y [ i ];
}
int main ( void )
{
int N = 1 << 25 ;
float * x , * y ;
// Allocate Unified Memory – accessible from CPU or GPU
// 内存分配,在 GPU 或者 CPU 上统一分配内存
cudaMallocManaged ( & x , N * sizeof ( float ));
cudaMallocManaged ( & y , N * sizeof ( float ));
// initialize x and y arrays on the host
for ( int i = 0 ; i < N ; i ++ ) {
x [ i ] = 1.0f ;
y [ i ] = 2.0f ;
}
// Run kernel on 1M elements on the GPU
// execution configuration, 执行配置
add <<< 1 , 1 >>> ( N , x , y );
// Wait for GPU to finish before accessing on host
// CPU 需要等待 cuda 上的代码运行完毕,才能对数据进行读取
cudaDeviceSynchronize ();
// Free memory
cudaFree ( x );
cudaFree ( y );
return 0 ;
}
使用 GPU 真正产生利用率是向 GPU 提交了一个一个的计算任务,可能是矩阵乘法、卷积操作、向量加法等任何并行计算任务,也就是前面提到的 kernel ,这个提交的过程被称为 kernel launch 。
HAMi-Core 中就是通过限制 kernel 的提交来实现 core limit,具体算法类似令牌桶,每次提交 kernel 都会消耗 Token,当某次提交 kernel 发现没有 Token 时就会直接 sleep,sleep 恢复后又分配一些 Token。
cuLaunchKernel
cuLaunchKernel 是 CUDA 的一个 API,用于启动一个 CUDA 核函数(kernel)。HAMi-Core 自定义的 cuLaunchKernel 方法中增加了 rate_limiter 逻辑,用来实现 core limit。
 1
 2
 3
 4
 5
 6
 7
 8
 9
10
11
// src/cuda/memory.c#L542-L551
CUresult cuLaunchKernel ( CUfunction f , unsigned int gridDimX , unsigned int gridDimY , unsigned int gridDimZ , unsigned int blockDimX , unsigned int blockDimY , unsigned int blockDimZ , unsigned int sharedMemBytes , CUstream hStream , void ** kernelParams , void ** extra ){
ENSURE_RUNNING ();
pre_launch_kernel ();
if ( pidfound == 1 ){
rate_limiter ( gridDimX * gridDimY * gridDimZ ,
blockDimX * blockDimY * blockDimZ );
}
CUresult res = CUDA_OVERRIDE_CALL ( cuda_library_entry , cuLaunchKernel , f , gridDimX , gridDimY , gridDimZ , blockDimX , blockDimY , blockDimZ , sharedMemBytes , hStream , kernelParams , extra );
return res ;
}
核心逻辑:rate_limiter
然后 rate_limiter 则是根据当前的使用情况和从环境变量中获取到的 limit 限制进行比较。
每次提交 kernel 都会减少 g_cur_cuda_cores,小于 0 时就会被 block (nanosleep),然后到下一个时间片的时候 g_cur_cuda_cores 又会恢复。
 1
 2
 3
 4
 5
 6
 7
 8
 9
10
11
12
13
14
15
16
17
18
19
20
21
22
23
24
25
26
27
28
29
// src/multiprocess_utilization_watcher.c#L34
void rate_limiter ( int grids , int blocks ) {
int before_cuda_cores = 0 ;
int after_cuda_cores = 0 ;
int kernel_size = grids ;
while ( get_recent_kernel () < 0 ) {
sleep ( 1 );
}
set_recent_kernel ( 2 );
if (( get_current_device_sm_limit ( 0 ) >= 100 ) || ( get_current_device_sm_limit ( 0 ) == 0 ))
return ;
if ( get_utilization_switch () == 0 )
return ;
LOG_DEBUG ( "grid: %d, blocks: %d" , grids , blocks );
LOG_DEBUG ( "launch kernel %d, curr core: %d" , kernel_size , g_cur_cuda_cores );
//if (g_vcuda_config.enable) {
do {
CHECK :
before_cuda_cores = g_cur_cuda_cores ;
LOG_DEBUG ( "current core: %d" , g_cur_cuda_cores );
if ( before_cuda_cores < 0 ) {
nanosleep ( & g_cycle , NULL );
goto CHECK ;
}
after_cuda_cores = before_cuda_cores - kernel_size ;
} while ( ! CAS ( & g_cur_cuda_cores , before_cuda_cores , after_cuda_cores ));
//}
}
当前 SM_LIMIT 限制大于等于 100 或者等于 0 就直接返回,没必要在判断要不要限制了。
1
2
if (( get_current_device_sm_limit ( 0 ) >= 100 ) || ( get_current_device_sm_limit ( 0 ) == 0 ))
return ;
获取限制配置:do_init_device_sm_limits
Limit 的限制从 CUDA_DEVICE_SM_LIMIT 环境变量获取,然后初始化到一个数组里。
 1
 2
 3
 4
 5
 6
 7
 8
 9
10
11
12
13
14
15
16
17
18
19
20
// src/multiprocess/multiprocess_memory_limit.c#L179
void do_init_device_sm_limits ( uint64_t * arr , int len ) {
size_t fallback_limit = get_limit_from_env ( CUDA_DEVICE_SM_LIMIT );
if ( fallback_limit == 0 ) fallback_limit = 100 ;
int i ;
for ( i = 0 ; i < len ; ++ i ) {
char env_name [ CUDA_DEVICE_SM_LIMIT_KEY_LENGTH ] = CUDA_DEVICE_SM_LIMIT ;
char index_name [ 8 ];
snprintf ( index_name , 8 , "_%d" , i );
strcat ( env_name , index_name );
size_t cur_limit = get_limit_from_env ( env_name );
if ( cur_limit > 0 ) {
arr [ i ] = cur_limit ;
} else if ( fallback_limit > 0 ) {
arr [ i ] = fallback_limit ;
} else {
arr [ i ] = 0 ;
}
}
}
核心 Limit 逻辑
真正的 Limit 逻辑如下,逻辑还是比较简单,有注释应该能看明白。
 1
 2
 3
 4
 5
 6
 7
 8
 9
10
11
12
13
14
15
16
do {
CHECK :
// 先是创建局部变量 before_cuda_cores,值和当前的 g_cur_cuda_cores 一样
before_cuda_cores = g_cur_cuda_cores ;
LOG_DEBUG ( "current core: %d" , g_cur_cuda_cores );
// 然后判断 before_cuda_cores<0
if ( before_cuda_cores < 0 ) {
// 小于 0 则说明当前已经没有 Token 了,就 sleep 一会
nanosleep ( & g_cycle , NULL );
// sleep 结束后通过 goto 跳转回去继续 check
goto CHECK ;
}
// 如果大于等于 0 都不做限制,使用当前 Token 减去要提交的任务消耗的 Token 数
after_cuda_cores = before_cuda_cores - kernel_size ;
// 最后则通过 CAS 把 after_cuda_cores 的值赋给 g_cur_cuda_cores
} while ( ! CAS ( & g_cur_cuda_cores , before_cuda_cores , after_cuda_cores ));
这里用得 do while + cas(Compare And Swap) 来保证,对 Token 的更新一定会成功。
1
CAS ( & g_cur_cuda_cores , before_cuda_cores , after_cuda_cores )
CAS 执行成功返回 true,失败则返回 false,这里使用 !CAS 作为 While 条件,也就是如果更新失败了就会一直重复循环。
还有两个问题:
先看第一个:nanosleep(&g_cycle, NULL); 会 sleep 多久
 1
 2
 3
 4
 5
 6
 7
 8
 9
10
11
12
13
14
15
16
17
18
//src/multiprocess/multiprocess_utilization_watcher.h
#define MAX_PIDS 1024
#define CAS(ptr, old, new) __sync_bool_compare_and_swap((ptr), (old), (new))
#define MILLISEC (1000UL * 1000UL)
#define TIME_TICK (10)
static const struct timespec g_cycle = {
. tv_sec = 0 ,
. tv_nsec = TIME_TICK * MILLISEC ,
};
static const struct timespec g_wait = {
. tv_sec = 0 ,
. tv_nsec = 120 * MILLISEC ,
};
算起来就是 10 * 1000 * 1000 纳秒,即使 10 毫秒,也就是每次 Token 不足时会 sleep 10 毫秒,之后再次判断。
接下来是第二个问题:还有什么地方在给 g_cur_cuda_cores 赋值,即:增加 Token 的逻辑在哪里?
Token 恢复逻辑
change_token
有一个 change_token 的方法在增加 Token
 1
 2
 3
 4
 5
 6
 7
 8
 9
10
11
12
13
14
//src/multiprocess/multiprocess_utilization_watcher.c#L63
static void change_token ( int delta ) {
int cuda_cores_before = 0 , cuda_cores_after = 0 ;
LOG_DEBUG ( "delta: %d, curr: %d" , delta , g_cur_cuda_cores );
do {
cuda_cores_before = g_cur_cuda_cores ;
cuda_cores_after = cuda_cores_before + delta ;
if ( cuda_cores_after > g_total_cuda_cores ) {
cuda_cores_after = g_total_cuda_cores ;
}
} while ( ! CAS ( & g_cur_cuda_cores , cuda_cores_before , cuda_cores_after ));
}
utilization_watcher
调用逻辑在 utilization_watcher 里,是一个死循环,一直在获取当前的 gpu 使用情况。
 1
 2
 3
 4
 5
 6
 7
 8
 9
10
11
12
13
14
15
16
17
18
19
20
21
22
23
24
25
26
27
28
29
30
31
32
// src/multiprocess/multiprocess_utilization_watcher.c#L190
void * utilization_watcher () {
nvmlInit ();
int userutil [ CUDA_DEVICE_MAX_COUNT ];
int sysprocnum ;
int share = 0 ;
int upper_limit = get_current_device_sm_limit ( 0 );
LOG_DEBUG ( "upper_limit=%d \n " , upper_limit );
while ( 1 ){
nanosleep ( & g_wait , NULL );
if ( pidfound == 0 ) {
update_host_pid ();
if ( pidfound == 0 )
continue ;
}
init_gpu_device_sm_utilization ();
get_used_gpu_utilization ( userutil , & sysprocnum );
//if (sysprocnum == 1 &&
// userutil < upper_limit / 10) {
// g_cur_cuda_cores =
// delta(upper_limit, userutil, share);
// continue;
//}
if (( share == g_total_cuda_cores ) && ( g_cur_cuda_cores < 0 )) {
g_total_cuda_cores *= 2 ;
share = g_total_cuda_cores ;
}
share = delta ( upper_limit , userutil [ 0 ], share );
LOG_DEBUG ( "userutil=%d currentcores=%d total=%d limit=%d share=%d \n " , userutil [ 0 ], g_cur_cuda_cores , g_total_cuda_cores , upper_limit , share );
change_token ( share );
}
}
一共做了几个事情:
1)初始化并获取当前 GPU 使用率
比较重要的是下面这个 upper_limit,也就是用户申请的 GPU Core,具体实现和前面分析的 Memory Limit 类似,这里就不再赘述了,也是从 CUDA_DEVICE_SM_LIMIT 环境变量中获取到的即可。
1
int upper_limit = get_current_device_sm_limit ( 0 );
初始化如下:
 1
 2
 3
 4
 5
 6
 7
 8
 9
10
11
12
13
int init_gpu_device_sm_utilization (){
int i , dev ;
ensure_initialized ();
lock_shrreg ();
for ( i = 0 ; i < region_info . shared_region -> proc_num ; i ++ ){
for ( dev = 0 ; dev < CUDA_DEVICE_MAX_COUNT ; dev ++ ){
region_info . shared_region -> procs [ i ]. device_util [ dev ]. sm_util = 0 ;
break ;
}
}
unlock_shrreg ();
return 1 ;
}
然后获取当前使用率
 1
 2
 3
 4
 5
 6
 7
 8
 9
10
11
12
13
14
15
16
17
18
19
20
21
22
23
24
25
26
27
28
29
30
31
32
33
34
35
36
37
38
39
40
41
42
43
44
45
46
47
48
49
50
51
52
53
54
55
56
57
58
59
60
61
62
63
64
65
66
67
68
69
70
71
72
int get_used_gpu_utilization ( int * userutil , int * sysprocnum ) {
struct timeval cur ;
size_t microsec ;
int i , sum = 0 ;
unsigned int infcount ;
size_t summonitor = 0 ;
nvmlProcessInfo_v1_t infos [ SHARED_REGION_MAX_PROCESS_NUM ];
unsigned int nvmlCounts ;
CHECK_NVML_API ( nvmlDeviceGetCount ( & nvmlCounts ));
int devi , cudadev ;
for ( devi = 0 ; devi < nvmlCounts ; devi ++ ){
sum = 0 ;
summonitor = 0 ;
shrreg_proc_slot_t * proc ;
cudadev = nvml_to_cuda_map (( unsigned int )( devi ));
if ( cudadev < 0 )
continue ;
nvmlDevice_t device ;
char uuid [ NVML_DEVICE_UUID_BUFFER_SIZE ];
CHECK_NVML_API ( nvmlDeviceGetHandleByIndex ( cudadev , & device ));
// Get device UUID
CHECK_NVML_API ( nvmlDeviceGetUUID ( device , uuid , NVML_DEVICE_UUID_BUFFER_SIZE ));
nvmlReturn_t res = nvmlDeviceGetComputeRunningProcesses ( device , & infcount , infos );
if ( res == NVML_ERROR_INSUFFICIENT_SIZE ){
continue ;
}
gettimeofday ( & cur , NULL );
microsec = ( cur . tv_sec - 1 ) * 1000UL * 1000UL + cur . tv_usec ;
nvmlProcessUtilizationSample_t processes_sample [ SHARED_REGION_MAX_PROCESS_NUM ];
unsigned int processes_num = SHARED_REGION_MAX_PROCESS_NUM ;
res = nvmlDeviceGetProcessUtilization ( device , processes_sample , & processes_num , microsec );
LOG_DEBUG ( "processes_num=%d \n " , processes_num );
LOG_DEBUG ( "Device UUID: %s \n " , uuid );
if ( res == NVML_ERROR_INSUFFICIENT_SIZE ){
userutil [ cudadev ] = 0 ;
for ( i = 0 ; i < infcount ; i ++ ){
proc = find_proc_by_hostpid ( infos [ i ]. pid );
if ( proc != NULL ){
LOG_DEBUG ( "pid=%u monitor=%lld \n " , infos [ i ]. pid , infos [ i ]. usedGpuMemory );
summonitor += infos [ i ]. usedGpuMemory ;
}
set_gpu_device_memory_monitor ( infos [ i ]. pid , cudadev , summonitor );
set_gpu_device_sm_utilization ( infos [ i ]. pid , cudadev , 0 );
}
continue ;
}
for ( i = 0 ; i < processes_num ; i ++ ){
//if (processes_sample[i].timeStamp >= microsec){
proc = find_proc_by_hostpid ( processes_sample [ i ]. pid );
if ( proc != NULL ){
//LOG_WARN("pid=%u num=%d\n",processes_sample[i].pid,processes_num);
//proc = find_proc_by_hostpid(processes_sample[i].pid);
//if (proc!=NULL) {
// printf("inner pid=%u\n",proc->pid);
sum += processes_sample [ i ]. smUtil ;
summonitor += infos [ i ]. usedGpuMemory ;
//LOG_WARN("monitorused=%lld %d %d %d",infos[i].usedGpuMemory,proc->hostpid,proc->pid,pidfound);
//LOG_WARN("smutil=%d %d %lu %u %u %u\n",virtual_map[devi],devi,summonitor,processes_sample[i].smUtil,processes_sample[i].encUtil,processes_sample[i].decUtil);
//}
}
set_gpu_device_memory_monitor ( processes_sample [ i ]. pid , cudadev , summonitor );
set_gpu_device_sm_utilization ( processes_sample [ i ]. pid , cudadev , processes_sample [ i ]. smUtil );
}
if ( sum < 0 )
sum = 0 ;
userutil [ cudadev ] = sum ;
}
return 0 ;
}
2)根据限制值和当前使用情况计算本轮可以增加的 Token
具体要增加多少 Token 则由 delta 方法计算
1
share = delta( upper_limit, userutil[ 0] , share) ;
具体如下:
 1
 2
 3
 4
 5
 6
 7
 8
 9
10
11
12
13
14
15
16
17
18
19
20
21
// src/multiprocess/multiprocess_utilization_watcher.c#L77
int delta ( int up_limit , int user_current , int share ) {
int utilization_diff =
abs ( up_limit - user_current ) < 5 ? 5 : abs ( up_limit - user_current );
int increment =
g_sm_num * g_sm_num * g_max_thread_per_sm * utilization_diff / 2560 ;
/* Accelerate cuda cores allocation when utilization vary widely */
if ( utilization_diff > up_limit / 2 ) {
increment = increment * utilization_diff * 2 / ( up_limit + 1 );
}
if ( user_current <= up_limit ) {
share = share + increment > g_total_cuda_cores ? g_total_cuda_cores
: share + increment ;
} else {
share = share - increment < 0 ? 0 : share - increment ;
}
return share ;
}
以上就是 HAMi-Core 中恢复 Token 的逻辑。
至此,Core Limit 就分析完了。
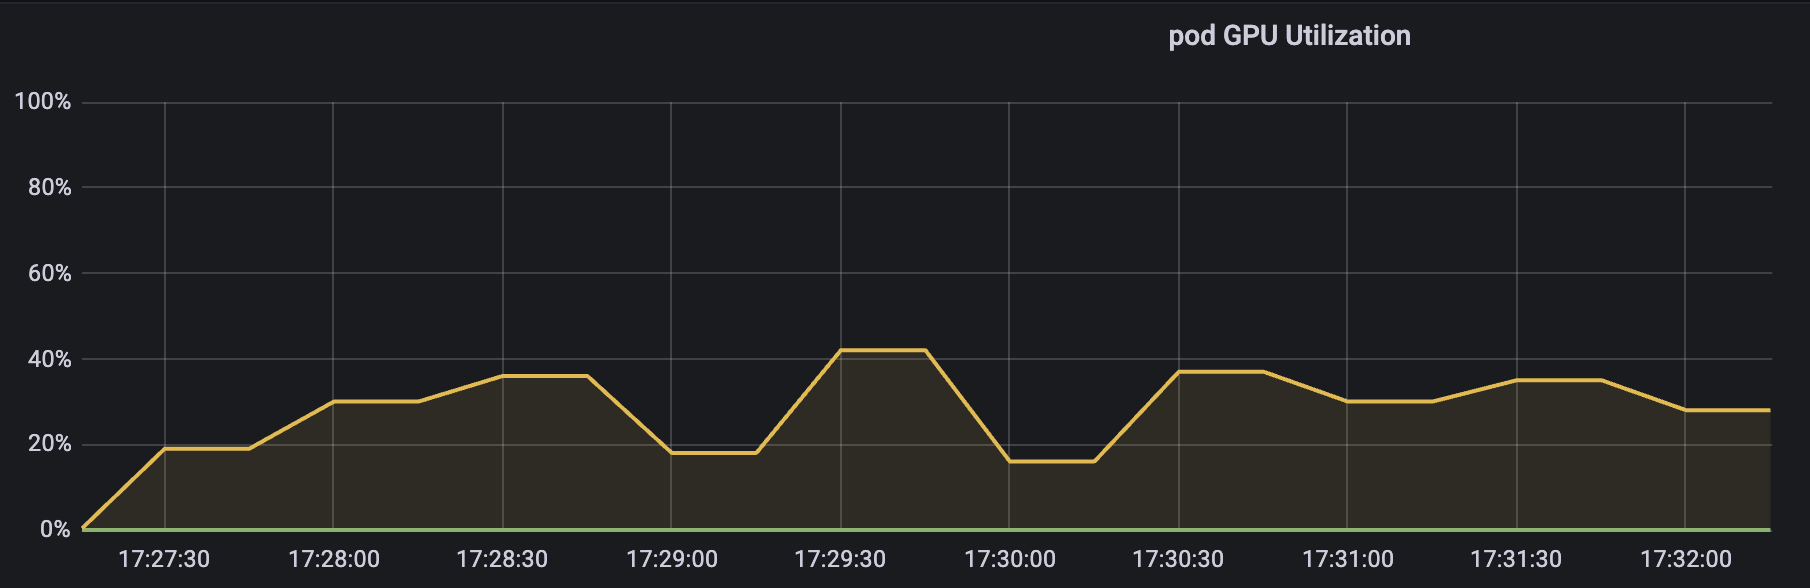
这也符合,之前 开源 vGPU 方案 HAMi: core&memory 隔离测试 测试的结果,GPU 使用率短期看可能会超过阈值,但是时间拉长来看,平均值始终在阈值附近波动。
上图为 GPU Core Limit 设置为 30 时的测试结果
5. 小结
本文主要分析了 HAMi Core 的工作原理,HAMi 这边算力限制用的类似令牌桶的形式限制进程对 kernel 的提交,提交 GPU 任务会消耗 token,消耗完之后就不让提交了,等下一轮 token 恢复之后才能继续提交,实现的效果和你说的这个应该差不多。每轮恢复的 token 是固定的,取决于 Pod 创建时申请的 Resource。(大概是这么个情况)。
对 C 并不是很熟悉,所以有什么地方写错了,大家一定留言指正呀~
libvgpu.so 是怎么生效的?
1)device plugin 在 Allocate 方法中使用 hostPath 方式将宿主机上的 libvgpu.so 挂载到 Pod 中取
2)并通过 LD_PRELOAD 方式实现优先加载上一步中挂载的 libvgpu.so 库
3)通过注入环境变量 CUDA_DEVICE_MEMORY_LIMIT_X 和 CUDA_DEVICE_SM_LIMIT 指定 Memory 和 Core 的阈值。
CUDA API 怎么拦截的?
通过重写 dlsym 函数,以劫持 NVIDIA 动态链接库(如 CUDA 和 NVML)的调用,特别是针对以 cu 和 nvml 开头的函数进行拦截。
gpu memory 是怎么限制的?
首先是拦截 NVMLAPI 中的 _nvmlDeviceGetMemoryInfo,实现在执行 nvidia-smi 命令时只展示申请的 Memory(来源于CUDA_DEVICE_MEMORY_LIMIT_X。
然后是拦截内存分配相关的 CUDA API,比如:cuMemoryAllocate 和 cuMemAlloc_v2。
分配内存之前,增加了 oom_check,当前 Pod 的 GPU 内存使用量 超过 限制的内存使用量(来源于CUDA_DEVICE_MEMORY_LIMIT_X)时直接返回 OOM。
gpu core 是怎么限制的?
同理,拦截提交 Kernel 相关的 CUDA API,例如:cuLaunchKernel。
提交 Kernel 之前,增加 rate_limit 逻辑,具体算法类似令牌桶,每次提交 kernel 都会消耗 Token,直到某次提交 kernel 发现没有 Token 时就会直接 sleep, 一段时间之后 Token 恢复了,又可以继续提交任务了。
恢复 Token 时就会用到CUDA_DEVICE_SM_LIMIT 环境变量。